Perfect and Juicy Smoked Christmas Turkey with Brown Rice Stuffing

Perfect and Juicy Smoked Christmas Turkey with Brown Rice Stuffing

Dozer’s Garage

Perfect juicY smoked Christmas turkey

with brown rice stuffing
 

You CAN smoke a turkey for the holidays that’s bang on with smoky flavour and a nice crispy skin and is also moist and delicious.  

Servings

8 – 12

Ready In:

4.5 – 6 hours

Difficulty:

(3) Not hard but have patience

Good For:

Christmas, Thanksgiving, Summer dining, Families


Perfect Christmas Turkey in the Smoker


Print Friendly, PDF & Email


We’re going for a simple turkey with approachable, summery flavours everyone can enjoy on a warm Australian Christmas.    There’s lots of room for adaptation in this one but this should get you started!   We’re after a perfectly juicy Christmas turkey with some zing to it’s crispy skin and an umami packed stuffing with some freshness to balance the dish.

Note that a bigger bird could take much longer and possibly dry out before all parts are cooked to a safe temperature.  Two smaller birds for a larger group will usually give go better.

TURKEY INGREDIENTS

  • 1 or 2 Australian grown turkeys, fresh, approx. 3.5kg.    
  • 60 grams of soft (but not melted) butter
  • Rubs (we used Bulldozer Bird Brain & Bulldozer Game Face rubs)
  • ¼ cup peanut, canola or sunflower oil

STUFFING INGREDIENTS

  • 1.5 cups of brown rice, pre-cooked
  • 1 red onion, diced
  • ½ red capsicum, diced
  • 1 small carrot, diced
  • 1 stalk celery, diced
  • 2-3 brown mushrooms, diced
  • 2 cloves garlic, minced
  • 1 lemon, juice and zest
  • ½ cup of frozen peas
  • About 50 gms of soft cheese, diced small.  Brie, camembert, blue cheeses all could work.
  • 1 sprig fresh rosemary leaves
  • About 10 sage leaves, chopped
  • 1 egg 
  • 1 tablespoon Dijon mustard
  • ¼ cup pomegranate juice (some other juices could be nice here)
  • 50 grams of butter, melted
  • Bulldozer Game Face rub

Instructions for the turkey

  1. Check to make sure there’s nothing in the turkey’s cavity.   Pat it dry and tuck the wing tips behind the neck.   Tie the legs if you want a more formal look. 
  2. Moosh up a couple of tablespoons of rub into the butter so it’s distributed well.
  3. Very gently work your fingers under the turkey skin over the breast area, starting from the bottom until the skin has lifted away from the breast meat on both sides.
  4. Push the butter & rub mixture in under the skin and distribute it around until all areas over the breast are pretty even.   Then gently push the skin back down into its normal position.   The butter helps with keeping the lean turkey moist and flavourful.
  5. Roll the turkey over and coat the bottom lightly with oil and then the rub (as much as you’d like!)
  6. Roll it back and do the same oil and rub(s) on the top.
  7. Spoon in the rice stuffing until almost full.  (see rice stuffing recipe below)
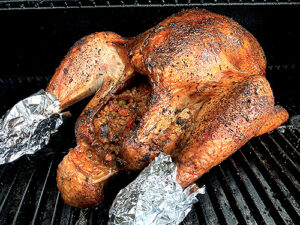
  8. Stick the bird in your cooker at 225F (107C), add your preferred wood and get cooking.
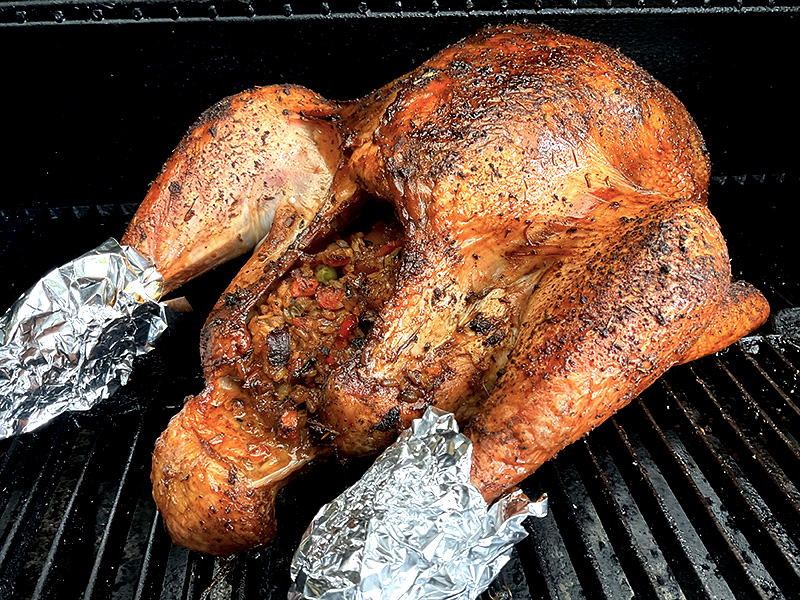
  9. Spritz a bit every 30-40 minutes and wrap a little foil around the feet whenever they look done.   Rotate every now and then for even cooking.
  10. Around 80-90 minutes into the cook, bump your temperatures up to 265F (130C).   This will help get it done before it dries out and will give you a nicer, crispy skin but keep a closer eye on it at this point and tent it with foil once the skin looks the way you like (golden)
  11. Pull it out and rest it for at least 30 minutes.
  12. Suggestion:   put a pan under it to catch the drippings if you want some awesome flavour kick for your gravy.


Instructions for the STUFFING

  1. Dice up the capsicum, carrot and celery to a small size and sautee in a sauce pan with a bit of oil and butter.   
  2. Add in the diced onion, mushroom, garlic, rosemary and sage.   Continue sauteeing until soft.  
  3. Place cooked rice in a large bowl.   Zest lemon over rice and add melted butter, cheese.
  4. In a separate bowl, mix together thoroughly the juice of ½ lemon; pomegranate juice, one egg. Dijon mustard and ¼ cup of Game Face rub.  
  5. Toss this liquid mixture, the sauteed vegies and frozen peas through the rice.  
  6. If you’ve finished all the turkey steps, you’re ready to stuff the bird.  Spoon or hands will work fine.  Don’t pack it too tight when you do – you want some heat and smoke to get in.
  7. Once the cook is done, remove the stuffing from the turkey cavity into a bowl.  Add the juice from the other half lemon plus a large pinch of sea salt and stir before serving.   A little hot sauce wouldn’t be out of line here either! 
turkey in smoker500x375
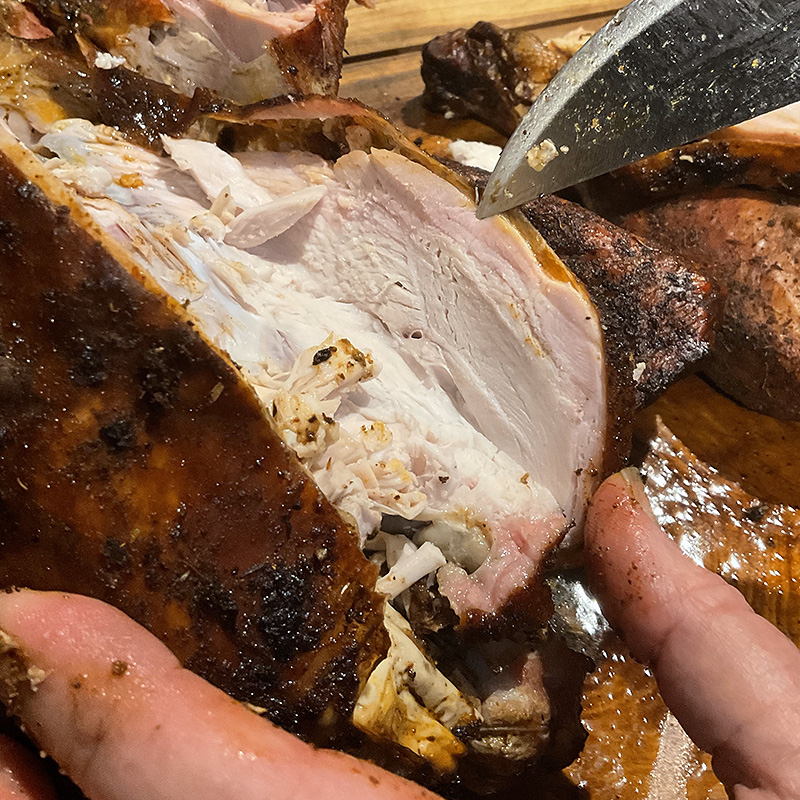
Smoke ring in that juicy breast meat

TEMPS & SPECS

Smoke chamber temperature  –  225F (107C) for 90 minutes, 265F (130C) for the remainder

Final meat temperature  –  165F (74C) in the breast, 175F (80C) in the thigh

Cook time (may vary by cooker, outside temps and how many times you peek) –  4 -5 hours without stuffing,  5-6 hours stuffed

Recommended woods  –  Hickory, Cherry… or try Pecan, Apple, Ironbark, Jam Wood!

Options & Tweaks

There’s just no shortage of things you can change and add to this Perfect Juicy Smoked Christmas Turkey recipe!

  • Change up the rubs.  Jerk, cajun or lemon pepper are great options.
  • Rubs with sugar will give a darker skin.  Try a sugar free rub like Bulldozer SPOG or Big Ballsy for a lighter, golden skin.
  • Add some small croutons to the stuffing before cooking.
  • Include fresh herbs like rosemary and thyme to the butter under the skin
  • Hardwoods like oak or ironbark give a different flavour base than hickory.  Fruitwoods are always well suited.
  • Cheese can be omitted if needed.  
Hot Wings

Hot Wings

Dozer’s Garage

HOT WINGS RecipeS


Ain’t no thing like a chicken wing.

Servings

8

Ready In:

30 min

Difficulty:

(2) Pretty easy

Good For:

Chicken

Wings 5 Ways

Print Friendly, PDF & Email

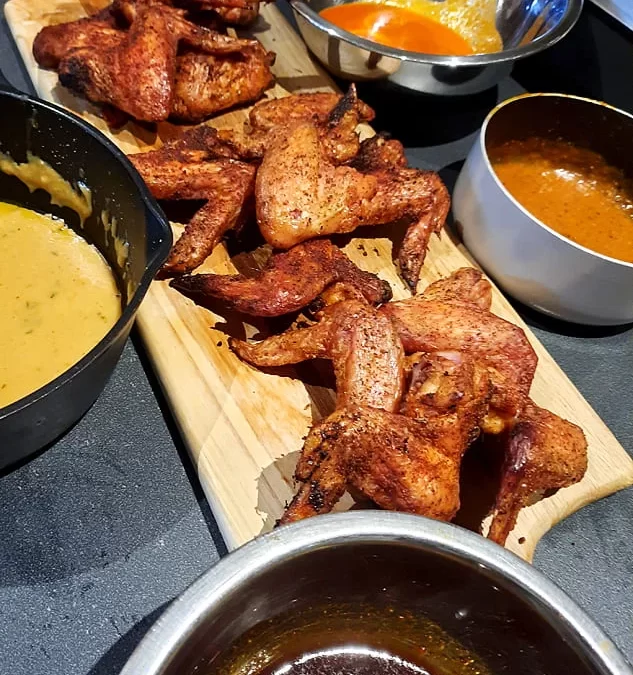
Everyone loves chicken hot wings.   Make a batch and watch everyone come running.   You don’t even need a sauce if you cook them well but then the sauces make them even better.

So are hot wings the same thing as buffalo wings?   Sort of.   Buffalo wings are hot wings with a very specific type of sauce.  They were first served in Buffalo, New York.   But not all hot wings are Buffalo wings.

This is not low and slow cooking.   You’ll want to get your bbq (closed) or your oven piping hot – around 450F (~230C) with the lid on.  Get your wings on when the fire is hot and just have a look every now and then.  When they’re crispy skinned, that’s when the saucing starts.   We’ve included several sauce recipes here.   Most of the sauce recipes are pretty straightforward and require little more than a blender or a saucepan.

Have a look at the Options & Tweaks section for ideas to make it your own

Get ’em while they’re hot!  These actually travel well and aren’t too bad when cold so don’t sauce them all if you have too many.  But for safety, throw them out if they’ve been sitting out (between 5C and 60C) for more than 4 hours total.


INGREDIENTS

(WINGS)

      INGREDIENTS

      (AUTHENTIC BUFFALO WING SAUCE)

      • 1/2 cup cayenne hot sauce.  The original used Franks.
      • 60 g  melted butter
      • 1 tsp garlic powder
      • 1/4 tsp cinnamon

          INGREDIENTS

          (STICKY ASIAN WING SAUCE)

          • 1/4 cup Australian honey
          • 1/4 cup plum sauce
          • 1/4 cup soy sauce
          • 2 TBSP rice vinegar
          • 1 TBSP Sriracha
          • 1 TBSP minced garlic
          • 1 TBSP minced ginger
          • 1 TBSP sesame oil
          • 2 tsp fish sauce
          • 1/4 tsp Chinese 5-spice

            INGREDIENTS

            (HOT or NOT HONEY MUSTARD)

            • 1/2 cup mayonnaise
            • 4 TBSP Australian honey
            • 1 TBSP Dijon mustard
            • 1 TBSP American yellow mustard
            • 1 or 2 chillis for the hot version, choose chillis that are as hot as you like, from cayenne to reaper
            • 1 tsp balsamic vinegar
            • 2 cloves minced garlic
            • 1 tsp Bulldozer Hogfather Rub  
            • salt and cracked pepper to taste 

              INGREDIENTS

              (GARLIC PARMESAN SAUCE)

              • 1/2 cup mayonnaise
              • 1/8 cup chicken stock
              • 8 cloves garlic cloves
              • 3 TBSP grated parmesan
              • 1 TBSP olive oil
              • 1 TBSP white vinegar
              • 1 TBSP Bulldozer Midnight Rub
              • 1/2 TBSP fresh rosemary leaves
              • 1 tsp lemon juice
              • 1 tsp white sugar

                  Step 1

                  Pile your coals in the center of the bbq. Crank your bbq as hot as possible, letting it heat with the lid on.   A Kettle Kone or other ‘concentrator’ over the coals will help increase the available temperature. Ideally you’d want about 450F. (230C).  Adding a block of fruit wood adds a lot of great barbecue flavour.  In a pinch though, your oven will do a good job.


                  Step 2

                  Toss your wings with a bit of oil or spray oil on each side. Lay them out on a board or tray and sprinkle each side with the rub(s) of your choice.  You’ll find a good rub = a tasty wing before you even bother with sauce.


                  Step 3

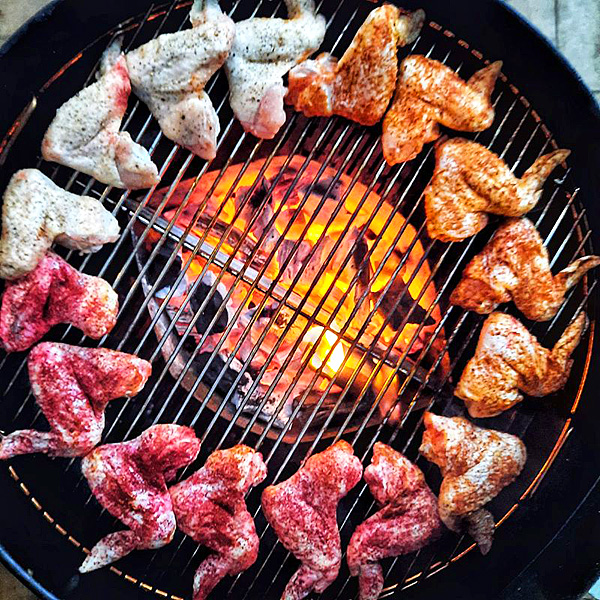
                  We lay the wings out in a circular pattern on the grill, never directly over the flame, with the meatiest ends towards the coals.   It can be easier (and make more room on the grill)  to first remove the wingtips and even to separate the two halves into ‘wingettes’ and ‘drumettes’.   Makes no difference to the cooking.


                  Step 4

                  It’s usually not necessary to turn the wings during the cook.   Just take a peek every so often, but remember every time you look, you lose your built-up heat for a bit.   When the wings look deeply golden and crispy, they’re done.


                  Step 5

                  Buffalo Sauce:   Melt the butter in a saucepan large enough to hold all ingredients.   Reduce heat as soon as it’s fully melted, then add hot sauce, salt and spice.  Whisk until wisps of steam rise, then stop.   Toss cooked wings in the sauce and serve. 


                  Step 6 

                  Sticky Asian Sauce:   Can be done in a bowl or while warming in a saucepan.   Just combine all ingredients and stir thoroughly.   Toss cooked wings and serve.


                  Step 7

                  Hot or Not Honey Mustard Sauce:   Blitz the chilli(s), garlic, mustards, vinegar, rub in a food processor or blender until everything is well chopped.  Add in the mayo and honey on low speed.  If it’s too thick, thin with a bit of water or chicken stock. Toss cooked wings and serve


                  Step 8

                  Garlic Parmesan Sauce:   Chop rosemary and garlic finely.  Add everything to blender and puree until smooth.   If too thick, thin it a little.  A little splash of white wine is nice in this.  Toss cooked wings and serve


                  Step 9

                  Any of these sauces can be thickened with cornstarch if necessary.   You want all these sauces to be just thick enough to cling to the wings without feeling more like a dip. 

                  Step 10

                  Hot wings are often served along side hot chips, tater tots (gems) or with carrot and celery sticks with a blue cheese dressing.  (maybe we’ll do a recipe on that dressing one of these days).

                  Options & Tweaks

                  • ‘5 ways’ is based on rub only or each of the 4 sauces.  There are an infinite number of choices and combinations when you get down to it though.
                  • We can fit about 16 whole wings on the Weber 57cm kettle with a coal base in the centre.  We’ve found devices like the Kettle Kone really do a great job of cranking up the heat.   Wings are definitely not a low n’ slow process.   The beauty is in that golden crisp skin, which you don’t get at low temps.
                  • You can do these any time inside as well, just not as smoky.
                  • More butter = less heat and vice versa.
                  • The sauces that use mayo are even better with homemade whole egg mayo – and that part is stunningly easy.  (Eggs, lemon juice, salt and pepper blended on medium while slowly adding in olive oil until it looks like mayo.)
                  • Any of these sauces has room for personalization.   More this, less that. 

                  Builder’s Basic BBQ Sauce

                  Builder’s Basic BBQ Sauce

                  Dozer’s Garage

                  Builder’s Basic BBQ Sauce Recipe


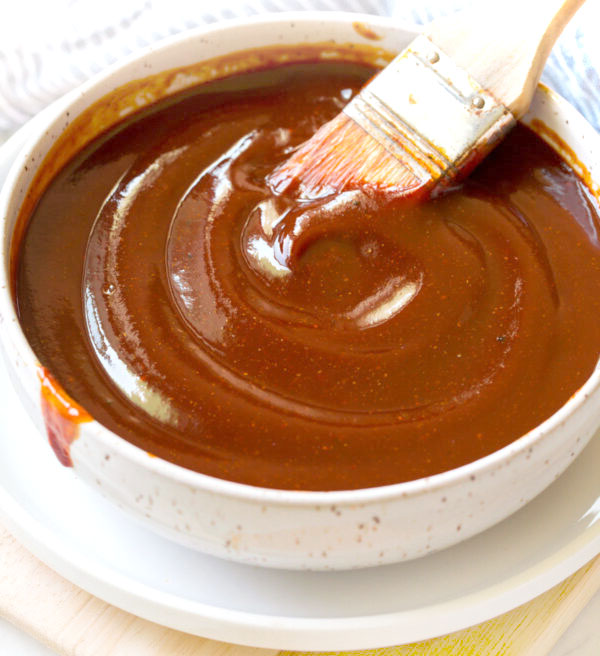
                  The basic rib and chicken sauce or glaze.  Tangy and sweet.  A base barbecue sauce recipe with lots of ways to change it up.

                  Servings

                  1

                  Ready In:

                  15 min

                  Difficulty:

                  (1) Dead easy

                  Good For:

                  Pork ribs, pulled pork and chicken

                  A Sauce to Build On

                  Print Friendly, PDF & Email


                  Here’s a basic sweet n’ tangy bbq sauce for finishing or glazing, using ingredients most people will have around the house.

                  It’s a nice easy sauce as described, but it’s particularly open to modification to your tastes or other uses.

                  Have a look at the Options & Tweaks section for ideas to make it your own

                  Keeps up to 3 days in the fridge (probably longer).


                  INGREDIENTS

                  • 1/2 cup tomato ketchup, any brand
                  • 1/4 cup brown sugar
                  • 1/4 cup apple cider vinegar
                  • 1/8 cup apple juice
                  • 2 TBSP Bulldozer Hogfather Rub
                  • 1 TBSP Dijon mustard
                  • 1 TBSP Worcestershire sauce
                  • 1 TBSP oil, canola or rice bran
                  • 1 tsp finely minced garlic
                  • 1 tsp sea salt
                  • 1 tsp cracked black pepper

                  Step 1

                  Add brown sugar, Hogfather rub, salt, pepper, vinegar and juice in a small saucepan and just bring to a boil, whisking as it heats.


                  Step 2

                  Add in ketchup, dijon mustard and worcestershire and whisk again.  


                  Step 3

                  Simmer for about 10 minutes.

                  Step 4

                  Add oil, whisk and remove from heat.   Let cool at least 5 minutes.


                  Step 5

                  Use a brush to cover a grilled or smoked rack of pork ribs,  cooked chicken and as a dressing for pulled pork.

                  Options & Tweaks

                  • Raise or lower the sweet or the tang by increasing or decreasing the amount of brown sugar and apple cider vinegar
                  • Hit it with some hot sauce for a little heat.  (We recommend some of our Pom Bomb)
                  • No big deal if you’d rather leave out the garlic
                  • Go with more of an Asian style by replacing some of the ketchup with hoisin sauce.   Alternately, add ginger, soy and use fish sauce instead of Worcestershire
                  • Add some melted butter.  Or honey.  Or both.
                  • For a competition glaze, add an extra TBSP of rub at the beginning and an extra teaspoon of oil plus an 1/8 cup of glucose at the end.  This will add extra shine and that hit of sweet flavour.

                  Naked Jalapeno Poppers

                  Naked Jalapeno Poppers

                  Dozer’s Garage

                  Naked Jalapeno Poppers Recipe


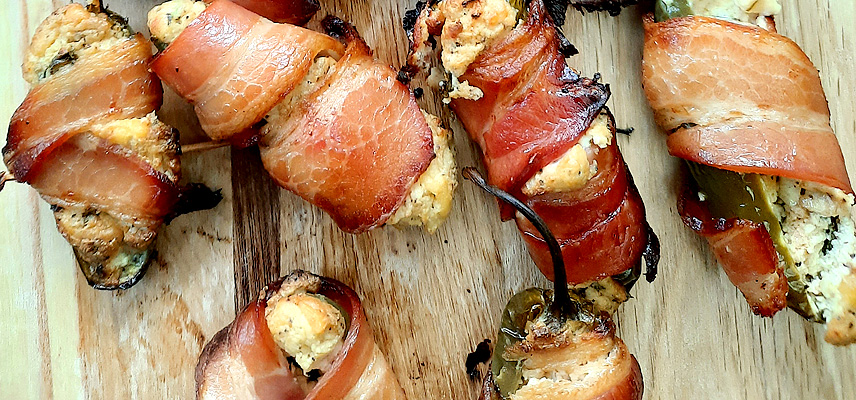
                  There are a number of ways to make a jalapeno popper.   This one’s our favourite.   Lightly spicy, so good.  And bacon.

                  Servings

                  4

                  Ready In:

                  60 min

                  Difficulty:

                  (3) Medium-ish

                  Good For:

                  Snacking

                  Perfect Poppers

                  Print Friendly, PDF & Email


                  Jalapeno poppers are great little project to haul out when you’ve got people over or even just as an appetizer for yourselves before the bbq.   

                  When we’ve got the charcoal kettle going, we’ll often stick these on right away, while waiting for the coals to burn down.   About the time you’re ready to stick the meat on, the poppers are ready and you’ve got your pre-meal snack.

                  The heat here depends on the jalapenos.  They can vary a lot.   But cooking them does mellow the spice level.

                  Not your plain old poppers. these have a nice balance.  There are a number of ways to do poppers.   Some put the halves back together, some batter and deep fry them.   But these, with bacon and a smokey, charcoal note are hard to beat!

                  Have a look at the Options & Tweaks section for ideas to make it your own

                  Eat these as soon as they’re comfortably cool.  They don’t really keep or reheat well.


                  INGREDIENTS

                  • 6 whole jalapeno chillis, very fresh (no wrinkles or grey around the stem)
                  • 1 small lime, juice of
                  • 125 g cream cheese, room temperature
                  • 50g  sharp cheddar cheese, finely chopped
                  • 1/4 red onion, finely diced
                  • 1 tsp finely minced garlic
                  • 3 TBSP Bulldozer SPOG Rub
                  • 12 strips of “streaky bacon” (in the US, just your usual bacon)

                    optional:  a pinch of coriander leaves (aka cilantro)

                  Step 1

                  Get your bbq going so the heat is leveling off around 225F (~107C).   We use a Weber Kettle with lump charcoal in a “Kettle Kone” at the center, lid on, along with a block of pecan wood for that smokey flavour.   But any bbq or even indoor oven will do if you can get the temperature right.


                  Step 2

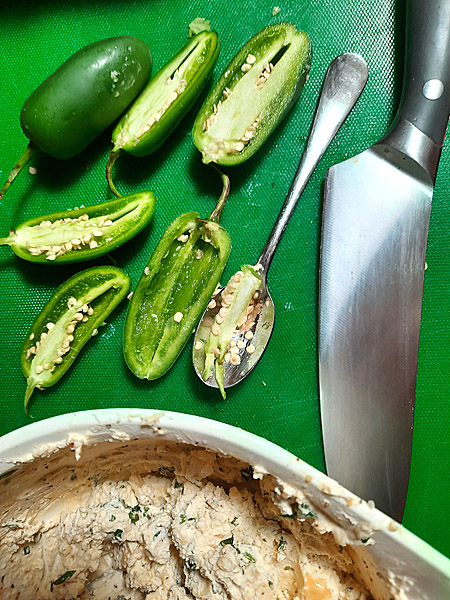
                  Start with big, shiny, fresh jalapeno chillis

                  Split each one lengthwise.  Don’t worry about removing the stem.


                  Step 3

                  Using a small teaspoon, as shown, scoop out the seeds and “ribs”.  You might want to use gloves for this bit.


                  Step 4

                  Next, dice/mince the cheddar cheese, the red onion and the garlic.  And the coriander leaves, if using.


                  Step 5

                  In a small bowl, combine the cream cheese, cheddar, lime juice, the Bulldozer SPOG rub, diced onion, garlic and coriander (if using) and mix thoroughly

                  Step 6

                  Using the small teaspoon again, fill each half jalapeno with the combined cheese stuffing until just barely heaping.


                  Step 7

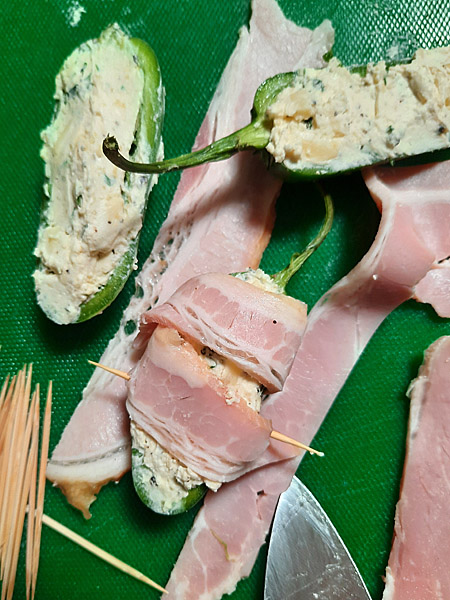
                  Lay out your streaky bacon and slice into strips, if necessary.  Strips should be roughly 25mm (1 inch) in width.


                  Step 8

                  Wrap a strip of streaky bacon around each jalapeno half in a spiral from stem end to tip.   This isn’t always the most precise process though you’ll likely get better at it over time.  Doesn’t matter – these taste great anyway.

                  Use toothpicks or small bamboo skewers through the bacon and chilli to hold the bacon in place


                  Step 9

                  At this point, arrange your jalapenos on the grill, filling side up, so they’re not directly over the flames.  We put the coals in the middle and the poppers in an outer ring around, but not over, them.   If you’re doing an oven cook, just put them on a lined tray.


                  Step 10

                  Check them in about 20 minutes.   You should find the bacon is crisping up and the chillis are getting soft.  When the bacon is looking so good you can’t hardly stand it, it’s time to pull them out.

                  If you’re able, let them rest for about 5 to 10 minutes but when you get impatient and burn the roof of your mouth, you won’t be the first.. or the last.   Totally worth it.

                  Options & Tweaks

                    • As always, add or remove what you like or don’t like.   Cook for yourself and your crew.
                    • Careful with the coriander (cilantro).  Some people love it, some only taste soap (it’s a genetic thing).  Consider checking with your guests.
                    • Brush with some sweet bbq sauce a couple of minutes before pulling them out.   Very popular option but we like ours more savoury.  Maybe do half n’ half?
                    • You can put the jalapeno halves together before wrapping or battering, but we like the way the semi-exposed cheese picks up that charcoal flavour and bacon drips.  

                    Show
                    Hide
                    comica ribs

                    Join the Fun!

                    Get in on special offers available only to subscribers; news about new products and upcoming events; and great recipes to help take your bbq & southern cooking to the next level!

                    Thanks! You're officially subscribed!